Starting Your Own Lawn Mower Repair Business

Starting Your Own Lawn Mower Repair Business

video synopsis on lawn mower repair by: Cherry A.

lawn mower repair south jersey

lawn mower repair

Larry Moore:  Small Business is struggling in this economy, there are some that are doing quite well.

Lare Moritz:  In fact, we’re right in the middle of boom times for the lawn mower repair shops

Dan Weinbaum:  If the neighbours are looking at you kinda funny because your grass hasn’t been cut, it might be because your lawn mower just won’t work.  It’s going to be a while before you can get it fixed though because repair business is booming.

John Martin:  Everybody has a yard where they cut it themselves or somebody else cuts it.  There’s a lot of machines out there.

Dan Weinbaum:  And there are a lot of machines here.  Row after row of lawn mowers, stacked up two by two and four or five deep.

John Martin:  These are all in here to be worked on.

Dan Wenbaum:  That’s a lot of lawn mowers.

John Martin:  It is.

Dan Weinbaum:  John Martin owns Triple A Lawn Service on North Oak and business, well it’s obvious.

John Martin:  On a Saturday from eight to one, we took in 52 units and that was a lot of typing.

Dan Weinbaum:  There are now about 200 mowers awaiting repair.  This is the busy season that many they have to line them up like neatly cut grass.

John Martin:  If you’re out here looking for  red mower with black tires, you would be out of here for a long time.

Dan Weinbaum:  And one mower right after another, into the shop it goes.

John Martin:  We’ve got one, two, three, four, five.  Five different guys working .

Dan Weinbaum:  There’s plenty of work for all taking the parts, putting them back together, keeping things sharp.

John Martin:  Everybody stays busy, it’s good for the economy as far as our economy.

Dan Weinbaum:  And more green in here means neat, clean green out there.  John says best time to take your lawn mower in for a repair is when there’s snow on the ground because that way  you’re ready for spring and you won’t have to wait in line.

Lawn Mower Repair: Replacing The Drive Belt

Lawn Mower Repair: Replacing The Drive Belt

this video synopsis on lawn mower repair, is brought to you by: Cherry A.

lawn mower repair business

lawn mower repair business

This video will show you how to replace the belt on a self-propelled front wheel drive mower depending on your model number, the instructions in this video might vary slightly.  Make sure you have the proper tools before beginning this project.

Refer to your operator’s manual for the correct replacement belt part number.  Remember to only use genuine factory belts.  They are designed specifically for your mower’s pulley system and torque needs.

Remove the spark plug wire to prevent accidental starting while you’re working.  Make sure the fuel tank has little to no fuel.  If the tank is full, use the Arnold Siphon Pump to pump the fuel into an appropriate container.  Tighten the fuel cap when finished.  Check that the oil dipstick is tight.  Remove the two shoulder screws that secure the front drive cover to the deck.  Press inward on the sides of the front drive cover to release the tabs that’s secured to the height adjustor brackets.

Remove the front drive cover from the mower and set it off to the side.  Loosen the screw holding the belt tension spring to the transmission.  As you loosen the screw, tension on the belt will be released.  Push the transmission, pivoting it towards the engine and slide the belt off of the transmission pulley.  Tip the mower on it’s side with the air filter up so you can remove the cutting blade.  When removing the cutting blade for any reason, protect your hands with a pair of heavy gloves or use a heavy rag to hold the blade.

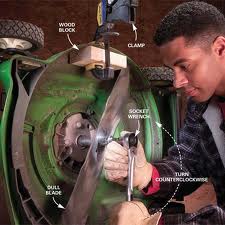
Use the Arnold Blade Removal Tool to hold the blade in place.  Remove the blade bolt and the blade bell support that attach the blade and the blade adaptor to the engine crank shaft.  Remove the blade and blade adaptor from the crank shaft.  Set all the parts off to the side.  Locate the bethel bracket that secures the engine bethel to the mower deck housing.  Press inward on the tab on the engine bethel to release it from the bethel bracket.  Remove the engine bethel and set if off to the side then remove the blade adaptor pulley unit.

Hold the belt through the opening in the deck housing.  Lubricate the engine crank shaft and the inner surface of the blade adaptor with a very light coating of oil.  Slide the blade adaptor on to the crank shaft.  Push the blade adaptor all the way until it bottoms out on the crank shaft…to catch the rest of the lawn mower repair south jersey, check out this great mower video.

Lawn Mower Repair: Lubricating The Mower

Lawn Mower Repair: Lubricating The Mower

this video synopsis on lawn mower repair is brought to you by: Cherry A.

lawn mower repair NJ

Hi my name is Pete Gutwein  and today we’re gonna talk about some basic minor repair for mowers here.  The next thing you want to look at a mower will probably be to lube the mower doesn’t have any grease dirt on it where you can actually use a grease gun but there are some places that you want to lubricate up and make sure that they’re working properly.  You can use any kind of lubricant.

You don’t have to use a special mower lubricant or whatever.  I just have some silicone lubricant over here that will work really good.  Just kinda walk around the mower and lubricate everything that you see.  The ends of the cables, most of them are covered up by these plastic covers but  there’s some point right here where you wanna make sure it’s nicely lubricated.  Same with that on the top.

Kind of just work it through.  You can lubricate the wheels.  It’s pretty simple but it does help prolong the longevity of your mower and make sure that things last – cables and such last a lot longer so you’re not running to the lawn mower store  when your grass is, you know, up to your knees or whatever.  That’s basically how you would lube up a lawn mower thus completing a necessary and much needed lawn mower repair. Check out the attached video for more visual info on the lawn mower repair process.

Lawn Mower Repair: Fixing A Spring

Lawn Mower Repair: Fixing A Spring

this video synopsis on lawn mower repair is presented by: Cherry A.

lawn mower repair south jersey

Hi my name is Bill Parker and today I am going to show you how to replace the spring on your pull cord or somewhat.  We got two different styles here.  This style has got  poles that come out and engage.  This style here uses a clutch style that sits inside.  The first one with the pole style, we’re just going to remove the tension on the spring by just letting it wind itself back in then we will remove the cap.  Once that’s done and out of the way, you can release the pulley.  This one has a pre-wound spring in it.  You can’t replace this spring without replacing this pulley.  So it comes as a complete assembly, you can get it from your lawn and garden dealer.  When you get it, you will put it back on.  When you do, you’re gonna spin  it backwards until you feel it catch.  It catches right there.  Put our poles back on, and our retainer.  Feed the rope through the hole and then we put our handle back on.

This style, you see in most lawn mower engines.  We are going to do the same thing.  We are going to release the tension on it.  This spring is replaceable.  We just let the rope go in and let it release the tension.  Now on the side here is where the spring is located.  You can use a pair of needle nose, we are going to grab the end of that spring and move it to the large part of the opening and just pull it out.  As you can see, it’s  a very large spring.  When  you get to  the end, all you do is give it a turn and pull it out.  Okay, so we got the spring out.  What we are going to do is just turn it backwards  and just pull it through our fingers.  Put a little tension back into it so that when it coils up, it’s got the proper tension.  So we got the spring as straightened out as we’re gonna get it.  It doesn’t have to be flat straight.  Set that aside.  We put our pulley back in, bend our tab down and before we go further, make sure that the pulley turns cause it’s bound up now, it’s still gonna be bound up later.  Now we get the spring back in.  Remember what I said about that little hole.  That hole plays a big part.

Lawn Mower Repair: Installing A New Blade

Lawn Mower Repair: Installing A New Blade

this video synopsis on lawn mower repair is by: Cherry A.

lawn mower repair new jersey

Hi my name is Pete Gutwein and today we are talking about doing some basic lawn mower minor repairs to your walk behind mower here.  Now that we have taken the blade off and we have sharpened it, we are going to talk about putting it on.

Something that I like to do before I put on the blade, is to clean up the back.  Grass fills up in there from mowing your lawn wet or you know, your kids left the sprinkler on or whatever.

So what you wanna do is you want to clean all that stuff out and it’s kind of an enemy to your lawn mower cause you need a lot of air flow in there to bring up the grass to cut it and so with all that dirt and old grass and stuff just kinda blocks that airflow so we are going to go ahead and use a basic gasket scraper here.  You can pick one of these up anywhere but you can use a screwdriver or whatever.  Anything that’s easy.  Then you just give it a good scrape.  You can see there’s a lot of stuff on this one, it hasn’t been done for a while.  There we go with the lawn mower repair south jersey. Give it a try…

And now we can reinstall the blade.  What you want to do is, you want to make sure that the edge is up or towards the mower.  I have seen instances where the blade was installed backwards.  So you go ahead and throw it on there.  Line up all the holes the way it came off and line up the bolt and just give it a good crank, nice and tight.  And the other thing you might want to do while you are down there is make sure that these nuts and bolts are nice and snug.  Sometimes they can loosen up on you.

So that’s how you would clean out a deck and put your blade back on…for a much needed lawn mower repair and maintenance.

Lawn Mower Repair: A Lawn Boy Mower

Lawn Mower Repair: A Lawn Boy Mower

this video synopsis on lawn mower repair is by: Cherry A.

lawn mower repair south jersey

I apologize for the video quality but my good camera is dying on me.  But anyway, I’ve gotten a small job here.  Fix this Lawnboy mower.  Doesn’t even look like a LawnBoy mower engine anymore, actually looks like a Tecumseh but I don’t know.  Last I was told it won’t start.   That was about a year ago.  It just kind of paddled and died out.  So I’m going to drain the gas out of it, clean the dirt and all that and see what’s what on the carb.

I’m just gonna reach up under here.  Get that fuel line loose, no gas.  Okay, I will put that back on.  Let’s start by taking this off.  I’m gonna knock off the dust with my air compressor.  One thing I’m going to check that I noticed, the kill switch, there is electrical tape on it.  Doesn’t look like it’s factory.  So I’m gonna try my wrenches, find the right size.   While you’re servicing, might as well clean it up.  I’m not sure if the governor spring is functioning properly.  That’s the kill switch wire and that doesn’t look factory.

There is a hole in it.  Looks burnt.  And then we look at the carb, don’t know how well you can see that.  So that’s pretty bad and I’m gonna go ahead and take care of this little item here.  Maybe put some tubing on or something that’s a little more heat resistant. You can see the holes in it.  I’ll do that.  Pull on all the dust off here, clean off the carburetor and at least see if it’s got a spark. That will do it for the lawn mower repair bit. Check out the video for more info on helpful lawn mower repair in south jersey or elsewhere.

Lawn Mower Repair: DIY Maintenance Tips

Lawn Mower Repair: DIY Maintenance Tips

this video synopsis on lawn mower repair, is brought to you by: Cherry A.

lawn mower repair

lawn mower repair

Today we’re going to discuss about how to dispose of your used oil and stale gas the  proper way.  Now, I cannot express to you how important it is to dispose of these materials in the proper way.  Not only do you risk poisoning  pets, lawns, groundwater and if you have children, you’re also gonna risk having fines when people turn you in for dumping your oil and your gas illegally.

What we have here is  a master drain.  This is where I store my oil in.  I’ve changed it from my other unit.  So it’s pretty easy, you can get this at any hardware store and any sort of automotive shop.  What it is is just a container that holds dirty oil.  It has a little strainer.  So I take my old oil, pour it, making sure not to spill.  I’m also gonna wipe out my container with my dirty rage.  There you go and unfortunately, this rag just has to be thrown away.  However, I have now disposed of my oil in this particular lawn mower repair south jersey.

Now if you have questions about where you need to take your oil, once this container gets filled, simply take it to your local automotive shop or you can take to your small engine repair shop and they will either charge you a small amount to dispose of it or they will dispose of it for free.  I also do know of some garbage pick ups, well, if you just set out your oil next to your garbage, they will pick it up and just charge it to you in your regular montly garbage bill.  Super easy and they will take care of it for you.

Lawn Mower Repair: The Weed Eater

Lawn Mower Repair: The Weed Eater

video synopsis on lawn mower repair by: Cherry A.

Since I am waiting for parts to come in for my M and D mower, I will look at the lawn

lawn mower repair

lawn mower repair

mower now.  I did some research and I’ve put everything that I’ve found  and description.  If i read off the list in this video, it’s going to be almost ten minutes long.  First, I will get the spark plug.

This spark plug, I don’t see any signs of fouling and the gap looks good.  Most Briggs engines are .030 gap.  I will get my filler gauge and check it.  The filler gauge had the gap at .035 and it should be .030 according to the owner’s manual but I corrected that.  I bent it down slightly with pliers and re-gapped it to the proper size .030 inch.  Now I’m guessing that this isn’t the only thing that needs to be done.  I will clean the air filter, take the fuel tank off, drain that and put fresh fuel in.  Take the muffler off and check for carbon and the governor linkage.  I think there is something wrong with that.

Most of the work I am going to be doing off camera.  It’s already 84 out here, 10 after 9 in the morning.  One thing the research said to look for was broken or damaged fly wheel keys.  They all look good and just by turning this, I know that it has good compression.  That’s another thing to look for.  And I do have the spark plug out, it will not fire.  The ignition coil looks good, dirty but good.  The governor and what it might be for the pulsing idol, the governor’s string is stretched. I might have to fix that.  It’s simply taking some of the links out and reconnecting it.  That usually does it.  And while I’m at it, I’m going to do an oil change.  We have never changed the oil on this since we’ve had it.  It’s been maybe 3, 4 years.

The only think I can think of is that governor spring.  I don’t know how to check the ignition.  What I don’t know how to do, I leave alone.  I have the exhaust off.  There is some carbon in there.  I will take a torch and try to burn that off.   First the threads on here, that’s bent.  I don’t know if that makes any difference or any kind of seal.  Is this the carburetor here?  I am not really sure.  That’s all plastic.  I don’t know what to think of it. Check out this great video for more info on lawn mower repair south jersey or in your area.

Lawn Mower Repair: Mower Repairs For Profits

Lawn Mower Repair: Mower Repairs For Profits

this video synopsis on lawn mower repair, is by: Cherry A.

Mower Repairs For Profits

mower repairs for profits

Welcome to repairing lawn mowers for profit.  In this short video, I am going to show you how to quickly replace a kill switch on a lawn mower.

You can do this if you have a problem starting your lawn mower, for example, if you don’t see a spark, you may also want to do this if you’re having problems when your lawn mower starts  and it’s fine but you struggle to shut the lawn mower down, for example the engine keeps running.  In both cases, you could have a problem with the kill switch.  So in this short video, I will show you how to replace it.

Now the easiest way to do this, first of all there are three bolts, one on this side, one on that side and one on the far side.  This removes the engine cover.  So what you should always do, remove the spark plug wire first of all before you start doing any repairs.  Just for good measure I always remove the spark plug as well so there will be no accidents.

Now with the engine cover removed, what we can see underneath here is the ignition coil.  So there’s a small wire that runs from underneath here, straight on this side of the fly wheel, it clips on here and it runs down to the back where the kill switch is normally situated.  So that’s where we need to do this lawn mower repair south jersey.  So if you’re having big problems starting your lawn mower, you also replace the wire to see if you notice a difference, to see if you can get a spark.  So just pull our little connector up there and maybe just hook the wire before you do anything else.  Also, check that this isn’t loose.  If there’s any noise whatsoever, you are doing something wrong and that’s probably the cause of the mower not starting.

So on the opposite side, she’s here now.  You can see here we have this little switch now this is commonly known as the  kill switch.  As I mention there’s a wire that runs here on the back there.  This is from the ignition coil.  Now the leads can sometimes have a break that stops from getting a spark, connect under here.  Press this top down, push the wire in the little hole as you can see.  Now what can happen is, as I have said, sometimes the wire can burn.  Sometimes very occasionally.  It doesn’t happen that much.

Lawn Mower Repair: Installing A Gas Tank

Lawn Mower Repair: Installing A Gas Tank

video synopsis on lawn mower repair is by: Cherry A.

Good morning mowermedic1.  Today we have a recycler on the bench.  If your gas tank is

lawn mower repair

lawn mower repair

leaking like this one.  It leaks around the seam and it leaks down and you can see it dripping.  I am going to show you how to replace the fuel tank on a Briggs and Stratton Engine.

First thing you wan to do is remove the decorative cover off of the engine, suck out all of your old gas or you can remove the fuel line and drain it to an appropriate container and dispose of it properly.  Here we go.  You can see right there, you want to remove these 3/8s bolts.  It’s shoulder bolt.  Next, remove the gas tank retaining screws.  There is three of them.  Get your little magnet and retrieve your screws.

Don’t lose the screws because you, you tilt the gas tank backwards, those screws will just go flying and you will never find them.  Next thing you want to do is unrope your rope from the rope holder.  I get asked five million times in a day.  Once you get your gas tank screws out, your gas tank is free and ready to be replaced.  You can tell right there where it’s leaking at the seam.  Get your new fuel tank, it will come in a box like this.  Part number right there is 699374.

When you remove your old fuel tank, it had a bushing that goes right here for a spacer.  The new fuel tank actually has an integrated bushing so it doesn’t fall out.  Just use the one that comes with the tank.  Pull your rope through and just kinda set the tank there and don’t tighten them but just start all your screws here.  Now you can tighten up  the attaching bolt that actually holds the tank to the engine block.  It will get on there.  Hmmm, I’m gonna have to do this two handed.  Hold on just a minute.  There we go.  Just snug it and then you go around and tighten all the rest of the screws.

Put your new piece of fuel line on and attach it to the fuel tank.  Sometimes you need to loosen the clamps first but this is acting a little stubborn.  Now we can slide it on and go further.  There you go.  Get your fuel lines on there and you are good to go.  Tighten down your screws and you are good to go with your lawn mower repair south jersey.